Start Here: A Simple Path to Cleaner Rugs in Elizabeth, New Jersey
If you are new to caring for area rugs, welcome. Clean rugs make rooms calmer, air fresher, and colors richer. In Elizabeth, New Jersey, seasonal humidity, winter salt, and everyday city dust mean your fibers need a little extra attention. This step-by-step beginner guide shows you exactly how to plan, test, clean, and dry safely in a home setting. Along the way, you will learn when to handle tasks yourself and when expert rug cleaning is the better choice.
Begin by understanding what you own. A flatwoven runner in a hallway behaves differently than a dense, hand-tufted wool rug in a living room. Your approach should match fiber, construction, and the room’s traffic and sunlight. Keep your routine realistic, repeatable, and gentle, and you will see steady improvements without risking damage.
Step 1: Identify Fiber and Construction
Check any tags and look carefully at the face and back. Wool has a matte, warm look and feels springy; nylon feels smooth and resilient; polyester and olefin resist water-based spills but can hold oils; viscose and bamboo silk have a sheen and require great care. Construction clues: hand-knotted rugs show individual knots on the back; tufted rugs have a fabric backing; machine-made rugs may show a consistent pattern of stitching.
Why this matters: chemistry, agitation, and moisture must be tailored to the rug. Wool prefers neutral to slightly acidic cleaners and moderate temperature. Synthetic fibers tolerate a wider range but still benefit from low-residue products. Viscose demands minimal moisture and extremely gentle handling.
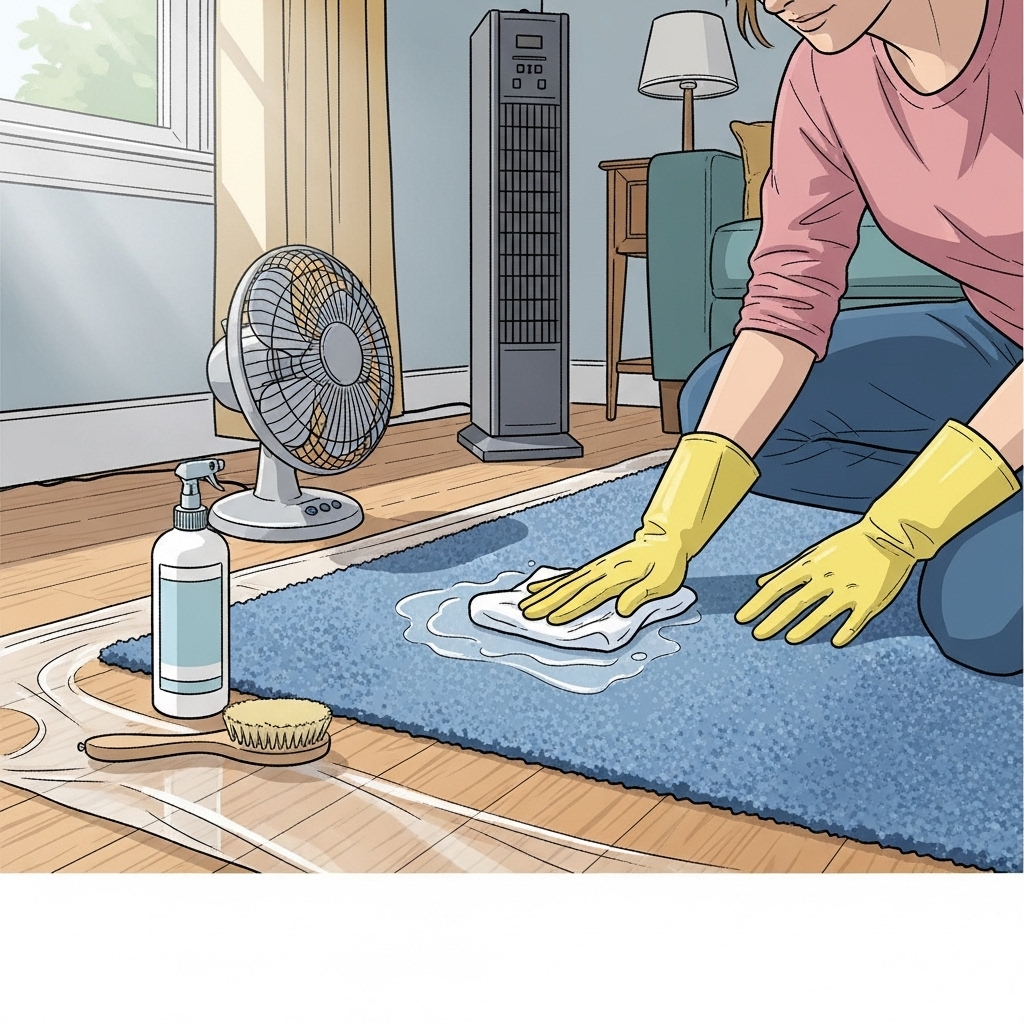
Step 2: Gather Tools and Prepare the Space
You do not need a closet full of gear. A sealed vacuum with adjustable suction, white absorbent towels, a soft brush or microfiber pad, a fiber-safe cleaner, a small bucket, and fans for drying are plenty for most beginner tasks. Protect floors with waterproof barriers if you plan to use moisture, and stage fans before you start to ensure quick drying.
Choose a time with low household traffic so the rug can dry without being disturbed. In Elizabeth’s humid months, add a dehumidifier if available to speed the process and protect wood floors.
Step 3: Test for Colorfastness and Stability
Press a white cloth dampened with cool water onto colored fibers for 10 seconds. If color transfers, avoid full wet cleaning and stick to very low-moisture methods or seek professional advice. Test your chosen cleaner the same way and check for texture changes or fuzzing.
Step 4: Dry Soil Removal
Vacuum slowly in overlapping passes. For delicate fibers, raise or turn off the beater bar and use moderate suction. Vacuum both sides of small rugs to remove grit that otherwise becomes muddy during cleaning. Edge vacuum to draw out dust along baseboards and beneath furniture lips.
Step 5: Targeted Spot Cleaning
Blot fresh spills with white towels. For coffee or tea, use a mild acidic cleaner; for greasy food, use a solvent-boosted spotter that is safe for your fiber. Apply sparingly, work from the outer edge inward, and avoid scrubbing that distorts pile. Rinse by blotting with a lightly damp towel to remove residues and then blot dry.
Pet accidents require quick attention. Blot thoroughly, dilute lightly with cool water, then apply a pet-safe neutralizer. Keep moisture controlled and dry fast to prevent lingering odor and dye issues.
Step 6: General Cleaning Method for Beginners
If your rug is color-stable and appropriate for mild wet cleaning, mix a neutral or wool-safe cleaner per label. Work in small sections. Gently agitate with a soft brush in the direction of the pile. Do not saturate; you should see light foaming at most. Follow by blot-rinsing with clean, damp towels to remove detergents. For low-moisture options, an encapsulation cleaner applied and worked in with a microfiber pad can reduce water use and speed drying.
Control the process. It is better to do two light passes than one heavy one. Keep fans running from start to finish, and elevate the rug if possible to allow air to pass underneath.
Step 7: Drying without Drama
Drying makes or breaks the result. Roll small rugs in clean, dry towels to remove excess moisture, then unroll and elevate. Aim fans across the surface, not with direct heat, and crack a window if the weather is mild and dry. Flip the rug partway through to balance drying. Complete dryness prevents odor, browning, and ripples.
Step 8: Groom, Inspect, and Reinstall
Once dry, groom fibers gently in one direction with a towel or wide-tooth brush. Inspect for remaining spots and repeat targeted treatments as needed. Use a compatible rug pad to prevent slipping, cushion traffic, and allow slight airflow that helps with future maintenance and drying.
Seasonal Focus for Elizabeth Homes
Winter: salt, slush, and grit demand quick matting at entrances and more frequent vacuuming. If you spot white salt rings, dissolve with light applications of cool water and blot thoroughly. Spring: pollen and fine dust collect quickly; ramp up vacuuming and consider a freshen-up cleaning. Summer: humidity slows drying—use dehumidifiers and strong airflow when cleaning. Fall: clear summer dust before windows close and indoor air cycles more.
Beginner Mistakes to Avoid
Skipping the colorfastness test invites dye bleed. Oversaturating pushes soil and spills deeper into backing and floors. Leaving detergent behind causes rapid re-soiling. Relying on heavy powders embeds residue that is hard to extract fully. Using high heat on wool can cause shrinkage, texture change, and browning.
When DIY is Not Enough
Some rugs demand special handling. Antique, silk, viscose, heavy wool with cotton foundations, and pieces with strong pet contamination are safer in a controlled facility. There, technicians can stabilize dyes, perform immersion baths, extract thoroughly, and dry under ideal conditions. Trying to replicate this at home can risk damage and prolonged drying.
Mid-Guide Confidence Boost
If you encounter persistent stains, recurring odors, or color movement during testing, pause and reconsider. Professional rug cleaning provides calibrated chemistry, precision rinsing, and forced drying that protect both beauty and structure. Knowing when to hand off the job is part of being a smart beginner.
Frequently Asked Questions
Q: How often should a beginner deep clean a rug? A: Start with once a year for average traffic, and increase to twice per year for busy living rooms or pet-friendly homes.
Q: What vacuum setting is safest for wool? A: Moderate suction with the beater bar raised or off. Use slow passes to lift grit without roughing the pile.
Q: Can I use vinegar on all rugs? A: No. While mild acidic solutions can help in some cases, always test. Some fibers and dyes react poorly even to gentle acids.
Q: How do I prevent browning after cleaning? A: Avoid oversaturation, rinse out detergents thoroughly, and dry quickly with strong airflow. Browning often occurs when moisture lingers and wicks impurities to the surface.
Q: Are powder deodorizers a good idea? A: They offer short-term scent but can embed in fibers and create dust. Focus on real soil removal and proper drying instead.
Q: My rug rippled after cleaning. What now? A: Allow full drying and place gentle weight on edges if needed. Persistent ripples may indicate backing issues; consult a professional.
Q: Do I need a pad under every rug? A: A quality pad improves safety, comfort, and airflow. Choose one that is compatible with your flooring type to avoid finish damage.
Q: Can I clean a viscose rug at home? A: It is risky. Minimal moisture and very gentle handling are required. Many viscose rugs fare better with professional care.
Make Your First Clean a Success
You do not need complicated tools to make a visible difference. Follow testing, keep moisture reasonable, and dry fast. Protect entries, vacuum regularly, and rotate rugs to balance sun exposure and wear. When you want extra assurance, color protection, and rapid drying that renews softness and vibrancy, schedule professional rug cleaning and enjoy a cleaner, brighter Elizabeth home with confidence in every step.