A truly clean bed supports deeper rest, clearer breathing, and a brighter start to your day. In Elizabeth, New Jersey—where humid summers meet busy, year-round schedules—mattresses collect sweat, body oils, dust, skin cells, and the occasional spill more quickly than you might expect. With the right routine and careful technique, you can deep clean your mattress at home and make real progress on stains, odors, and allergens. This step-by-step guide explains what to do, what to avoid, and how to keep results longer, while also noting when the smartest move is to bring in trusted deep mattress cleaning support for tasks that exceed DIY methods.
Before you begin, read your mattress label and any care instructions from the manufacturer. Memory foam, latex, hybrid, and innerspring designs respond differently to moisture and agitation. The golden rule is to control liquid volume and dry thoroughly. In a city like Elizabeth—where coastal humidity can slow evaporation—drying strategy is just as important as the cleaning steps themselves.
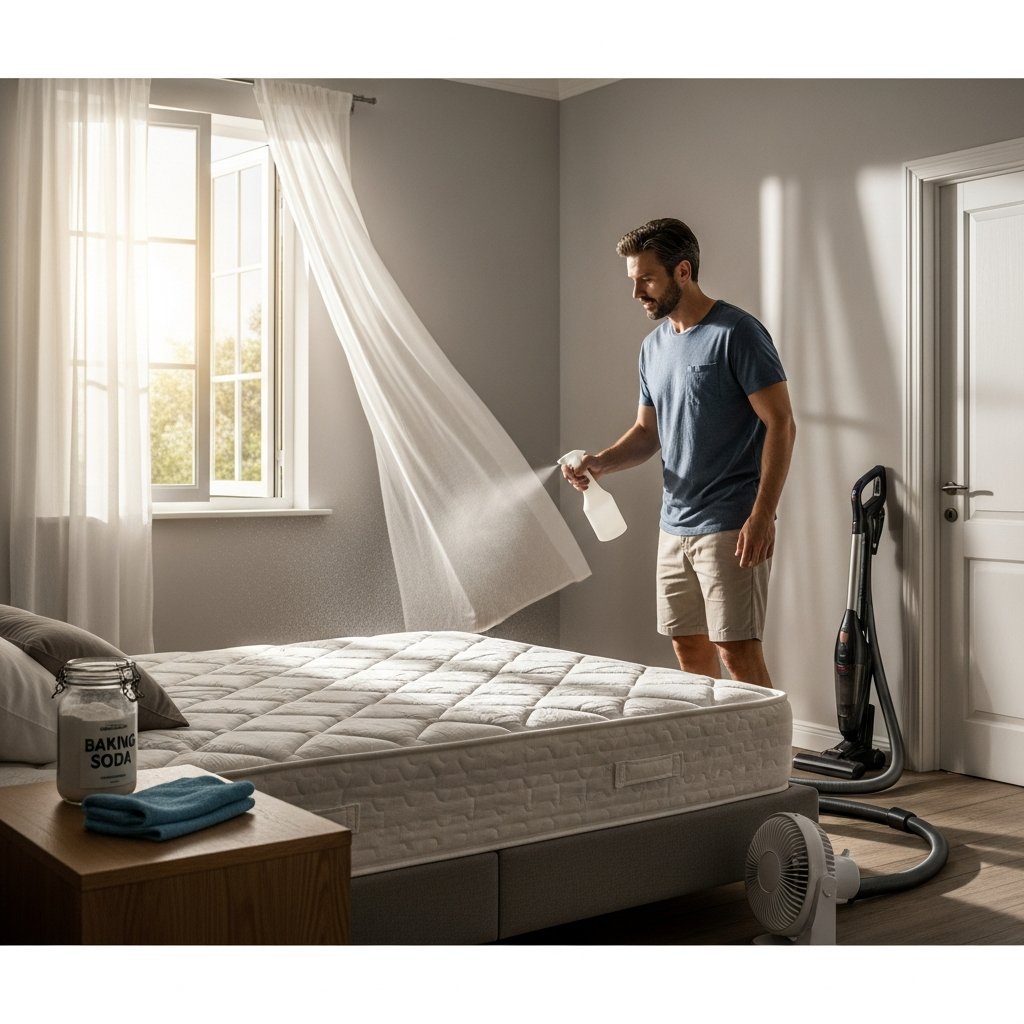
What You Will Need
- Vacuum with clean upholstery attachment, ideally with HEPA filtration
- Microfiber cloths and clean white towels for blotting
- Spray bottles for mixing gentle cleaning solutions
- Enzyme-based cleaner for organic stains such as sweat or pet accidents
- Oxygen-based, fabric-safe spot treatment for stubborn discoloration
- Mild, pH-balanced detergent for general surface cleaning
- Baking soda for odor absorption
- Fans or a dehumidifier to accelerate drying in humid weather
- Protective gloves and a small measuring cup for accurate dilution
Step 1: Strip and Stage
Remove all bedding, including protectors and toppers, and launder according to their tags. If you use an encasement, wash it on its own to prevent zipper damage. Clear surrounding furniture as needed so you have room to work. Good lighting helps you spot faint stains that might otherwise go unnoticed.
Step 2: Dry Soil Removal
Thoroughly vacuum the entire mattress surface using overlapping passes. Work slowly and pay special attention to seams and tufts where lint and debris gather. This step removes a surprising amount of fine dust and dander, setting you up for more efficient stain removal later.
Step 3: Spot Treatment Fundamentals
Address stains before general cleaning. Test every product on a hidden corner to check colorfastness. For organic stains like sweat or pet accidents, use an enzyme solution mixed per label directions. Apply sparingly, allow the recommended dwell time, and blot with a clean towel. For oxidized discolorations, a gentle oxygen-based product may help, but always avoid high-pH bleaches on mattress fabrics.
Step 4: Controlled Surface Cleaning
Mix a small amount of pH-balanced detergent with water in a spray bottle. Lightly mist a section of the mattress and wipe with a clean microfiber cloth in gentle, overlapping strokes. Work in small zones and avoid soaking the fabric. Rotate cloths as they pick up soils to prevent re-depositing grime.
Step 5: Odor Management
After treating stains and surface grime, sprinkle a light, even layer of baking soda across the mattress. Leave it for at least 30 to 60 minutes—longer if humidity is high—then vacuum thoroughly. Baking soda helps absorb residual odors while also wicking minor surface moisture.
Step 6: Drying Strategy for Elizabeth’s Climate
Drying is where many DIY efforts falter. The key is airflow. Prop the mattress if possible, aim fans across the surface, and consider running a dehumidifier to pull moisture from the air. In summer, air conditioning helps; in winter, avoid introducing excess moisture when windows are closed. Do not make the bed until the mattress feels dry to the touch across its entire surface, including corners and seams.
Special Cases and Cautions
- Memory Foam: Foam acts like a sponge. Use minimal solution, blot rather than scrub, and extend dry times. Over-wetting can lead to trapped moisture odors.
- Latex: Naturally resistant to dust mites but still sensitive to aggressive chemicals. Keep products mild and avoid harsh oxidizers.
- Hybrid/Innerspring: Fabric covers can tolerate slightly more moisture than foams, but restraint still wins the day. Focus on controlled application and robust extraction via towels and airflow.
- Pet Accidents: Enzyme cleaners are essential. If an odor lingers after your first treatment, repeat the process rather than adding more liquid at once.
- Unknown Stains: When in doubt, test and proceed slowly. Some stains are set-in dyes that respond poorly to aggressive spotters.
Deep Cleaning, Done Methodically
Work from top to bottom, side to side, and give each section your full attention before moving on. The most common DIY mistake is to rush through the process, leaving uneven results and damp patches that take too long to dry. Patience, light product application, and thorough blotting are your best tools.
When to Call a Professional
Even the most dedicated home cleaner will occasionally face issues beyond DIY scope: large or old stains, persistent odors after pet accidents, or moisture trapped deep in foam layers. Trained technicians bring advanced extraction, fabric-safe chemistry, and targeted sanitizing steps that resolve problems without guesswork. In the thick of your project—especially if you notice slow drying or stubborn discoloration—it can be reassuring to bring in experienced help for professional mattress cleaning that complements your hard work.
Keeping Results Longer
- Rotate Seasonally: Turn the mattress head-to-foot every three to four months to distribute wear.
- Use a Breathable Protector: Choose a protector that blocks spills while allowing airflow to reduce heat and moisture buildup.
- Weekly Linen Care: Wash sheets and pillowcases weekly. Launder protectors monthly or after any spill.
- Monthly Surface Vacuuming: A quick HEPA vacuum pass keeps fine dust and dander in check.
- Humidity Control: In humid months, run a dehumidifier or air conditioning to discourage odors and dust mite activity.
- Pet Habits: If pets sleep on the bed, brush them regularly and add a washable throw to capture fur and dander.
Elizabeth-Specific Tips
Living near busy corridors and industrial zones can increase airborne particulates. Vacuuming the mattress monthly is especially helpful in this environment. Likewise, plan deep cleaning around the most humid weeks of summer or the driest winter days so that airflow and drying conditions favor your efforts. If you rely on radiators or baseboard heaters, be mindful that they do not provide strong air movement; supplemental fans are a smart addition during drying.
Myths and Realities
- Myth: More water means a deeper clean. Reality: Excess moisture drives soils deeper into foam and slows drying, raising the risk of odors.
- Myth: Stronger chemicals equal better results. Reality: Fabric-safe, pH-balanced products with proper dwell time outperform harsh agents that can damage fibers.
- Myth: Steam alone fixes everything. Reality: Steam is a tool, not a cure-all. Certain foams and covers do better with controlled low-moisture methods.
- Myth: Baking soda fixes all odors. Reality: It helps, but entrenched odors from deep spills can require professional extraction and sanitizing.
Frequently Asked Questions
How often should I deep clean at home? A full DIY deep clean every 6 to 12 months works for most households, with monthly vacuuming to control dust. Homes with pets or allergies may benefit from shorter intervals.
Can I use vinegar or bleach? Avoid strong acids and bleaches on mattress fabrics. Mild, pH-balanced detergents and enzyme cleaners are safer and more effective.
Is it safe to steam a memory foam mattress? Direct, heavy steam is not recommended for most foams. If you use a garment steamer for surface refresh, keep it brief and light, and prioritize drying.
What if a stain spreads while I treat it? Stop, blot from the outside in, and reduce liquid volume. Give the product time to work before adding more.
Why does my mattress smell musty after DIY cleaning? It likely dried too slowly. Increase airflow, use a dehumidifier, and consider a follow-up with controlled moisture and thorough blotting.
Can I flip my mattress? Most modern mattresses are one-sided. Check the label. Rotating head-to-foot is usually recommended instead of flipping.
Do protectors make the bed hot? Look for breathable, waterproof protectors made from advanced membranes designed to release heat and moisture.
How long should I wait before remaking the bed? Do not add sheets until the mattress is fully dry to the touch everywhere. Rushing can trap moisture.
Should I clean my pillows too? Yes. Launder or refresh pillows per manufacturer guidance to maintain overall sleep hygiene.
When is replacement better than cleaning? If sagging, structural damage, or pervasive odors persist after professional cleaning, replacement may be the wiser choice.
Take the Next Step for a Cleaner Bed
If you want a healthier, fresher mattress without the uncertainty, pair your DIY routine with expert support when needed. Schedule convenient service, get clear guidance, and rest easier knowing the hard-to-reach issues are truly handled. For dependable care that respects your fabric and your time, explore trusted mattress cleaning and enjoy a better night’s sleep in Elizabeth.