Keeping your sofa clean in Elizabeth, New Jersey is about more than appearances—it supports a healthier, fresher home. Daily use leaves behind body oils, crumbs, pet hair, and city dust that settle into the weave. With the right plan and tools, you can handle a large portion of maintenance yourself and know when to call in deeper help. This step-by-step guide explains how to set up your space, choose safe methods for your fabric, and avoid common mistakes that lead to discoloration or lingering odors. If you decide you want a deeper refresh beyond DIY, you can always explore professional sofa cleaning to complement your routine.
Elizabeth experiences humid summers and bundled-up winters, both of which affect upholstery. Warm, moist air can slow drying after a spill, while closed windows in winter concentrate indoor dust. By pairing a smart home routine with occasional deep care, your sofa will look better and last longer.
Step 1: Identify Your Fabric and Cleaning Code
Before you touch the sofa with water or a cleaning product, identify the fabric and check for a cleaning code, usually found on a tag under cushions or along the frame. Typical codes include “W” (water-based methods acceptable), “S” (solvent preferred), “WS” (either with care), and “X” (vacuum only). These guidelines help you avoid over-wetting or using the wrong chemistry. Even with a favorable code, always test in an inconspicuous spot before proceeding.
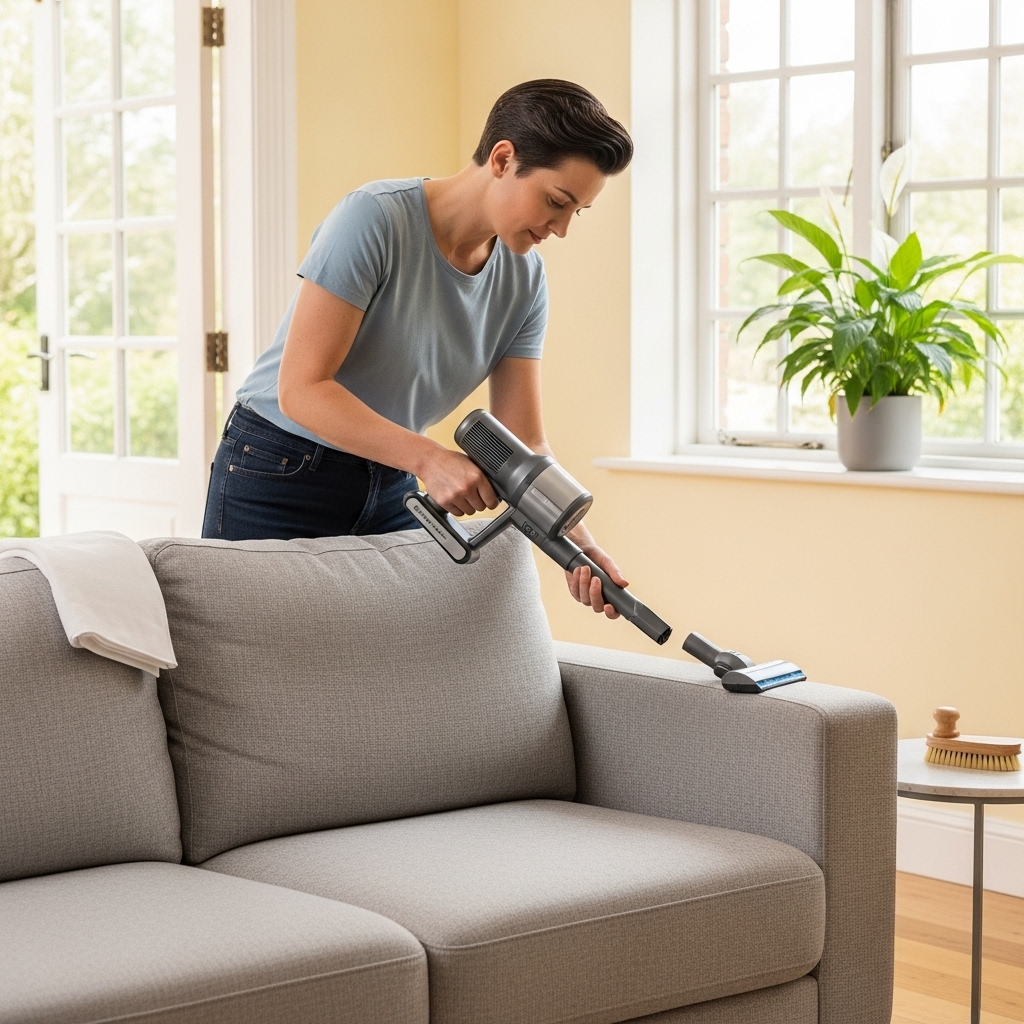
Step 2: Gather Tools
- Upholstery vacuum tool and crevice attachment
- White, lint-free cloths for blotting
- Soft brush for grooming fibers
- Two small buckets or bowls for separate clean and rinse solutions if needed
- Portable fan for airflow
- Fabric-appropriate spotter (tested first)
Avoid colored cloths that could transfer dye, and skip abrasive brushes that might fuzz delicate fibers.
Step 3: Vacuum Thoroughly
Vacuuming is your most powerful home tool. Work slowly, section by section, to capture hair, dust, and grit before they bind to the fabric. Pay attention to seams, buttons, and under-cushion zones. This single step often makes a visible difference and reduces the chance of mudding when you introduce moisture.
Step 4: Tackle Fresh Spills Immediately
Blot—never rub—with a white cloth. Press firmly to lift liquids and repeat with clean sections of the cloth. For thicker spills, gently lift solids with a spoon before blotting. If you use a spotter, apply a small amount to the cloth rather than directly to the fabric, and test first. Work from the outer edge toward the center to prevent spreading.
Step 5: Light Surface Freshening
For sofas that are generally clean but need a refresh, lightly mist a fabric-appropriate cleaner onto a cloth and wipe gently, or follow the product’s instructions for your fabric type. Keep moisture conservative and avoid soaking seams or tufted areas. Follow with a light rinse cloth moistened with clean water if recommended by the product, then blot dry with a new white cloth.
Step 6: Encourage Drying
Run a fan nearby and open a window if the weather allows. Airflow matters in Elizabeth’s seasons—summer humidity and winter closed windows make drying strategy important. Do not put throws or pillows back until cushions feel dry to the touch on all sides.
Step 7: Deodorize the Smart Way
True freshness comes from removing soil, not heavily perfuming the fabric. Keep your home’s air moving, vacuum weekly, and launder throws and pillow covers so they do not re-deposit odors. If a smell persists, it may be coming from deeper in the cushion and require professional attention.
Step 8: Know When to Call a Pro
DIY has limits—especially with set-in stains, unknown fabrics, or odors that seem to return as the room warms. A professional visit offers controlled moisture, fabric-specific chemistry, and better extraction to reach residues that home methods cannot. In Elizabeth’s busy households, pairing at-home care with periodic professional attention keeps upholstery feeling consistently fresh.
Common Mistakes to Avoid
- Scrubbing vigorously, which distorts fibers and sets stains.
- Using colored cloths or paper towels that can transfer dye.
- Applying too much product or mixing multiple cleaners, creating residues and chemical conflicts.
- Skipping airflow during and after cleaning, which slows drying and can cause musty smells.
Weekly and Monthly Routines
- Weekly: Vacuum with the upholstery tool, rotate reversible cushions, and inspect for new spots.
- Biweekly: Launder throws and pillow covers; groom fibers gently to maintain texture.
- Monthly: Check under cushions and along seams for crumbs, pet hair, or hidden spills and address them promptly.
Special Considerations for Homes with Pets
Pet hair clings to upholstery and hides along seams. Use a rubber grooming brush or a slightly dampened white cloth to gather hair before vacuuming. Address accidents immediately with blotting and airflow. If odors linger, deeper treatment may be needed inside the cushion.
Elizabeth-Specific Tips
- In summer, clean during cooler parts of the day to reduce humidity’s impact on drying.
- In winter, pair gentle heat with a fan for balanced, efficient airflow.
- If you live in a walk-up or condo, plan ahead when scheduling a professional visit so equipment access is smooth.
Fabric-by-Fabric Pointers
- Microfiber: Often responds well to gentle brushing and light, fabric-safe cleaners. Blot carefully to avoid rings.
- Linen and cotton: Be conservative with moisture. Test thoroughly and use a fan to speed drying.
- Wool blends: Use minimal agitation and avoid high heat. Blot carefully and allow generous airflow.
- Performance textiles: Follow manufacturer guidance and test; many are durable but still benefit from controlled methods.
Spot Testing: Your Safety Net
Always test in a hidden area. Apply a small amount of your chosen method to a white cloth and blot the spot. Check for dye transfer, texture change, or any darkening as it dries. If you see a problem, stop and consider professional help.
What Not to Do
- Do not soak cushions or apply boiling water—both can distort shape and risk color issues.
- Do not use abrasive pads or stiff brushes; they raise fuzz and cause wear.
- Do not rely on heavy fragrance to hide odors; remove the source instead.
When DIY Meets Its Limits
Set-in dyes, mystery spots, and lingering odors often need specialized tools and techniques. A professional can test the fabric, select tailored chemistry, and use steam-assisted extraction to flush residues safely. If you have tried multiple home methods without success, pressing pause and calling a pro prevents compounding the issue.
Preparing for a Professional Visit
Clear the area, share the fabric code if available, and point out specific concerns. Plan for airflow so drying is efficient. If you want to complement your home routine with a deeper reset, look for a local team that clearly explains their process and tailors it to your fabric. Consider a provider known for careful, results-focused sofa cleaning so your DIY efforts go even further afterward.
Frequently Asked Questions
Q: How often should I clean my sofa at home? A: Vacuum weekly and address spills immediately. Deeper care depends on use, pets, and fabric.
Q: Can I use the same cleaner on every fabric? A: No. Always check the cleaning code and test. Different fibers and dyes require different approaches.
Q: How do I prevent water rings? A: Use minimal moisture, blot instead of scrubbing, and dry with airflow. Work slightly beyond the spot to feather edges.
Q: Are handheld steamers safe? A: Use extreme caution. Without extraction, handheld units can overwet fabric. Test carefully or consider professional help for deep work.
Q: What about odors that persist after cleaning? A: Persistent smells often indicate deeper residues inside the cushion. Professional flushing and targeted treatments may be required.
Q: Should I remove cushion covers to wash them? A: Unless the manufacturer explicitly allows it and you understand the risks of shrinkage or color change, it is safer to clean covers in place.
Give Your Sofa a Fresh Start
With a clear plan and a few good habits, you can keep your upholstery looking inviting all year. Tackle crumbs and dust before they settle, act fast on spills, and let airflow do its work. When it is time for a deeper reset or help with tricky stains, schedule professional sofa cleaning and enjoy a living room that feels cleaner, brighter, and ready for everyday life in Elizabeth.