Introduction: A Complete Roadmap for Elizabeth, New Jersey Homes
From historic houses near Elizabethport to modern condos overlooking parks and transit, tile is a favorite surface for kitchens, baths, foyers, and laundry rooms. Yet many homeowners struggle with dingy grout lines, soap scum, and an overall loss of luster that creeps in despite regular mopping. This complete guide gives you a clear, step-by-step plan tailored to local conditions—humid summers, winter salt, and year-round foot traffic—so your tile can stay bright and your grout healthy. If you are evaluating the difference between a personal deep clean and a professional reset, you will also learn where DIY has limits and when strategic tile and grout cleaning can save you time while protecting delicate finishes.
Your success begins with understanding your materials, then building a cleaning routine around them. Add seasonal adjustments, better tools, and safer chemistry, and you can keep bathrooms free of haze, kitchens free of greasy film, and entries protected from road grit. Use this as a blueprint you can adapt for apartments, single-family homes, and everything in between.
Tile Types and Grout Basics
Most Elizabeth homes feature a mix of ceramic and porcelain for durability and affordability. Porcelain is denser and typically more water-resistant, making it popular for baths and high-traffic entries. Ceramic is widely used for backsplashes and floors where cost-effectiveness and a wide range of styles shine. Natural stone—marble, travertine, slate, and granite—appears in higher-end remodels and historic properties. Each tile type has care caveats: acids can etch marble and limestone; abrasive pads can scratch softer glazes; extreme alkalinity can leave a film or dull sheen on some surfaces.
Grout is the more vulnerable component. Cementitious grout, whether sanded or unsanded, is porous and absorbs liquids, oils, and colorants. Epoxy grout, common in newer kitchens and showers, is more resistant but can develop a surface haze if cleaned with the wrong product. Distinguishing your grout type informs whether you will need sealing and which cleaners are safest and most effective.
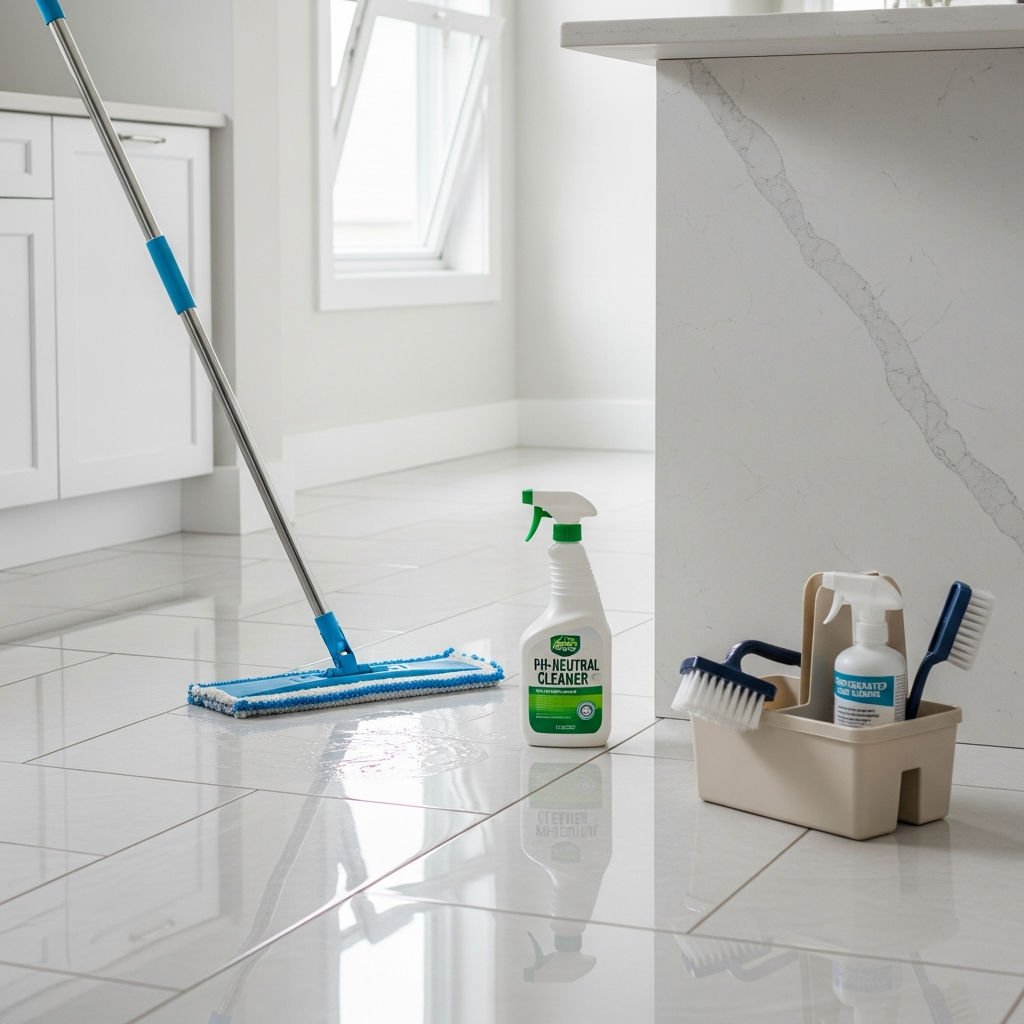
Essential Tools and Supplies
- Vacuum with hard-floor setting or high-quality dust mop
- Microfiber mops and cloths for efficient soil pickup
- Two buckets for solution and rinse water
- pH-neutral cleaner for routine maintenance
- Oxygenated cleaner or diluted hydrogen peroxide for organic stains
- Mild alkaline degreaser for kitchen films
- Grout brushes of varying stiffness, plus old toothbrushes
- Plastic or nylon scrapers for stuck residue
- Spray bottles for targeted application
- Protective gear: gloves, knee pads, eye protection, and adequate ventilation
- Penetrating grout sealer; stone sealer where applicable
Keep supplies in a portable caddy so you can move room-to-room smoothly. Replace worn brushes—frayed bristles reduce precision and force you to scrub harder than necessary.
Preparation: Inspection and Dry Soil Removal
Inspect tile and grout under strong light. Note cracks, missing caulk, or spalling in older installations. In bathrooms, pay special attention to the lower two rows of shower tile and behind shampoos and caddies. In kitchens, focus on the zone between the cooktop and sink, where cooking vapor and splashes meet. Mark areas of concern so you can compare before and after results, which helps you decide whether resealing is warranted.
Next, remove loose soil with a vacuum or dust mop, following with a quick damp wipe using plain water. This foundational step stops dirt from transforming into a muddy slurry during cleaning and greatly reduces the chance of micro-scratches on glossy tiles.
Mixing and Applying Cleaners with Dwell Time
Most tile cleaning failures come from rushing. Read dilution ratios carefully and respect dwell time, which allows chemistry to break soil bonds. For general cleaning, apply a pH-neutral solution and let it rest for three to seven minutes without drying. For greasy kitchen soils, a mild alkaline cleaner benefits from slightly longer contact, but never allow it to dry—re-mist as needed. On shower walls, apply from bottom to top to control run-off, then agitate and rinse top to bottom to carry loosened soil away.
Agitation: Choosing the Right Brush and Motion
Use a medium-stiff grout brush sized to fit your joints. Too small, and you waste effort; too large, and you ride on the tile edges instead of scrubbing the grout. Keep strokes short, varied in direction, and even in pressure. For tile faces, a soft scrub pad or microfiber towel works well to remove film without scouring. Avoid steel wool and hard abrasive pads that can scratch or leave residues that rust.
Rinsing and Drying: The Overlooked Secret to Brightness
Rinse thoroughly with clean water using a dedicated rinse bucket. Wring out often, change water as soon as it clouds, and do a final pass with fresh water to eliminate cleaner residues. Dry with microfiber to prevent water spots and help you spot any remaining haze, especially on darker porcelain or polished stone.
Deep-Cleaning Grout Lines: A Focused Approach
- Apply your chosen grout-safe cleaner after general tile cleaning is complete.
- Let it dwell according to label directions; avoid pooling in corners.
- Scrub joints with a grout brush, angling bristles into edges where buildup collects.
- Rinse thoroughly, then buff dry to reveal the true color of the grout.
- If areas remain shadowed after drying, repeat on those spots; heavily stained lines may need oxygenated boosters or professional extraction.
If you still feel you are chasing blotchy grout despite careful technique, consider a mid-project reset with a professional. In many cases, a one-time appointment for tile and grout cleaning restores uniformity that DIY methods struggle to achieve, especially on older, porous grout.
Natural Stone Considerations
Marble, limestone, and travertine are sensitive to acids and some alkaline degreasers. Use stone-specific, pH-neutral cleaners and avoid vinegar or lemon-based products. For soap scum, choose a stone-safe scale remover and watch dwell time. Rinse generously and dry immediately to prevent mineral spotting. On textured slate, keep agitation light and brush in the direction of the natural cleft to avoid lifting layers.
Sealing: Protection That Pays Dividends
Sealers reduce the rate at which grout and stone absorb liquids, giving you time to wipe away spills before they become stains. After a thorough clean and complete dry—preferably overnight with fans or open windows—apply a penetrating sealer. Work in small sections, keep the applicator focused on grout lines, and wipe away sealer that lands on tile faces before it hazes. Test water beading after cure to confirm coverage. Reapply as needed based on traffic, cleaning frequency, and the porosity of your materials.
Maintenance Schedules for Elizabeth Homes
- Daily to every few days: Dry dust or vacuum; squeegee shower walls after use.
- Weekly: pH-neutral cleaning of floors and shower walls; spot treatment of emerging grout shadows.
- Monthly: Edge detailing along baseboards, behind toilets, and around appliance legs.
- Seasonally: Post-winter salt removal and post-summer mildew prevention deep clean.
These intervals flex with your lifestyle, pets, and household size. The real measure is visual: when grout begins to shadow or tile looks dull despite routine care, it is time for a deeper pass.
Solving Common Problems
Soap Scum: Build-up is stubborn because it binds with minerals in water. Use a product designed for soap film, agitate with a non-scratch pad, and rinse thoroughly. Repeat light treatments work better than one aggressive attempt.
Mildew: Improve ventilation first. Treat with an oxygenated cleaner on ceramic and porcelain; for stone, use a stone-safe formula. Keep surfaces dry after showers and address leaks promptly.
Salt Residue: In winter, dissolve salts with plain water first, then clean with a neutral solution. Avoid harsh alkalinity that can leave a film.
Grease: Tackle with a mild alkaline cleaner and warm water, allowing dwell time. Rinse and dry thoroughly to avoid streaks.
Health and Safety
Good ventilation protects indoor air quality, especially in compact bathrooms and basements. Wear gloves, protect your knees, and avoid mixing chemicals. If you use stronger cleaners, limit exposure time and rinse surfaces well to protect finishes and reduce airborne residues.
Apartment, Condo, and Multi-Family Considerations
Smaller bathrooms and galley kitchens intensify humidity and concentrate soils. Use squeegees and microfiber cloths to dry surfaces quickly. Manage noise and ventilation thoughtfully by cleaning during daytime hours and opening windows where possible. Use door-draft stoppers in winter to keep slush from entering units near exterior stairwells.
Organization: Room-by-Room Checklist
- Entry: Vacuum edges, neutral clean, focus on grout at thresholds, rinse twice, dry.
- Kitchen: Degrease splash zones, neutral clean floors, detail under toe-kicks, rinse and dry.
- Bathroom: Treat soap scum, address mildew-prone corners, neutral clean, rinse and squeegee.
- Laundry/Mudroom: Dissolve salt and detergent drips, neutral clean, wipe appliance feet and hoses.
Mid-Project Course Corrections
If your cleaner dries too quickly, break the area into smaller sections or increase humidity slightly with a fine mist of water. If grout remains blotchy, repeat targeted applications with patience, allowing complete dry time between passes to judge results. If agitation causes splatter, switch to brushes with shorter bristles and reduce pressure.
When to Call Professionals
Persistent blotches, etched stone, and widespread soap haze are signals that you may be fighting uphill. Professionals use rotary tools, pressurized rinsing, heated extraction, and specialized sealers to achieve uniform results. Many Elizabeth homeowners opt for a professional reset every year or two, followed by simple maintenance that takes minutes weekly.
Frequently Asked Questions
Q: How do I know whether my grout needs sealing? A: Sprinkle a few drops of water. If they soak in and darken the grout within a minute, a sealer will help.
Q: Can I use baking soda on grout? A: Baking soda offers gentle abrasion on ceramic and porcelain installations but can scratch soft stone or glossy glazes. Test first.
Q: Why does my shower re-develop mildew quickly? A: Lingering humidity and poor airflow feed regrowth. Improve ventilation, squeegee after use, and address any leaks.
Q: Is steam cleaning safe? A: On intact ceramic and porcelain, light steam can help. Avoid on cracked grout and many natural stones.
Q: What is the best way to prevent soap scum? A: Use liquid body wash rather than bar soap, squeegee surfaces, and rinse walls briefly after showers.
Put the Plan into Action
With the right tools, dwell times, and seasonal habits, you can maintain bright tile and refreshed grout throughout the year in Elizabeth, New Jersey. Choose cleaners matched to your materials, rinse completely, and protect your results with sensible sealing and ventilation. When you want a faster reset or need help with stubborn staining, book professional tile and grout cleaning to restore uniform color, eliminate haze, and make weekly upkeep simple.