Introduction: Practical Tips for Real-Life Homes in Elizabeth, New Jersey
Tile is a hardworking surface in Elizabeth, New Jersey. From busy foyers near Broad Street to compact bathrooms in Elizabethport walk-ups, ceramic, porcelain, and natural stone take the brunt of daily life—shoes, pets, spills, steamy showers, and winter slush. The good news is that a few focused habits deliver outsized results. This guide distills proven techniques you can start using today to keep tile bright and grout lines crisp. And if you are considering how to complement your routine with occasional professional help, thoughtful tile and grout cleaning can reset surfaces so maintenance stays quick and easy.
These tips are organized for clarity: prevention first, then smarter cleaning, stain solutions, seasonal strategies, and long-term protection. You will also find a helpful FAQ and an action-focused wrap-up to keep momentum high.
Tip 1: Start with Dry Soil Removal
Before you ever reach for a cleaner, remove grit and dust. Vacuum with a hard-floor setting or use a dust mop to collect fine particles that act like sandpaper underfoot. This is especially important in entryways where road grit and salt accumulate in winter. By getting rid of dry soils first, you reduce the risk of micro-scratches on glossy tiles and stop muddy slurry from forming when you apply liquid cleaners.
Tip 2: Embrace Dwell Time
Let your cleaning solution do the heavy lifting. Mix a pH-neutral cleaner as directed and apply it in manageable sections. Give it three to seven minutes to work, misting lightly if it starts to dry. Rushing leads to more scrubbing and less uniform results. With enough contact time, grime softens and releases from grout so you can lift it with minimal effort.
Tip 3: Use the Right Brush for Grout
A medium-stiff nylon brush sized to your grout joints is your best friend. If the brush is too large, it will skip over the joint and ride on the tiles; too small, and you will waste effort and time. Keep your strokes short and vary direction to reach both edges of the joint. Switch to a softer brush for delicate tiles and corners to avoid scratches.
Tip 4: Two-Bucket Rinsing
Use one bucket for cleaning solution and a second for rinse water. This simple change prevents cloudy residues and helps tiles dry brighter. Replace rinse water as soon as it looks murky. Follow with a dry microfiber cloth to wick away remaining moisture, revealing true grout color and any patches that need a second pass.
Tip 5: Match Cleaner to Problem
- Grease and kitchen film: Choose a mild alkaline cleaner and warm water.
- Organic stains like coffee or mildew shadows: Try an oxygenated cleaner or diluted hydrogen peroxide (on non-stone surfaces).
- Soap scum: Use a product formulated for soap film; repeat gentle treatments instead of harsh scrubbing.
- Mineral deposits: Pick a scale remover that is safe for your tile type and avoid acids on natural stone.
Always test in an inconspicuous area. Older tiles and some glazes are more sensitive than they appear under normal light.
Tip 6: Protect High-Traffic Zones
Entry mats and runners capture soils before they reach tile. Choose mats with non-staining backings and wash them frequently. In kitchens, place a washable mat near the stove and sink to intercept splashes and grease vapor. High-traffic corridors between the entry and kitchen often need more frequent sweep-and-wipe cycles than other rooms.
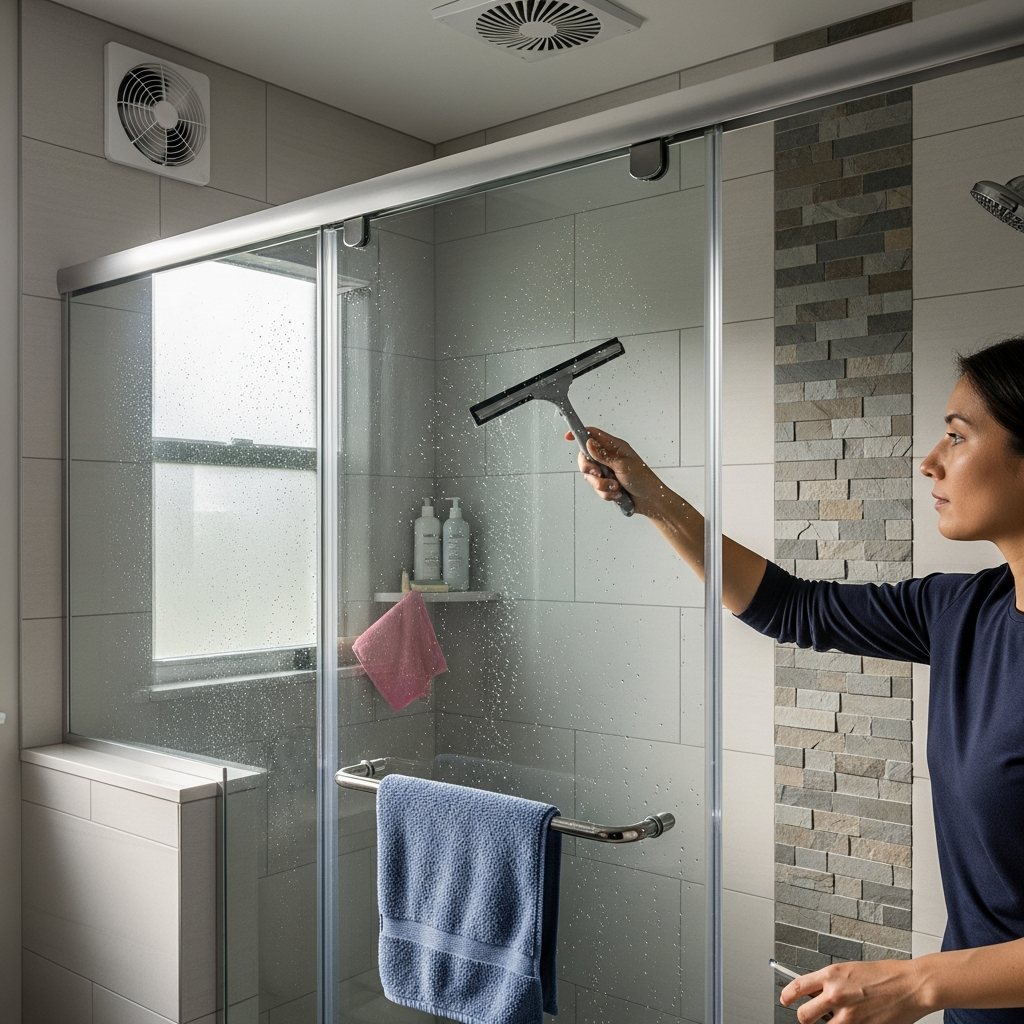
Tip 7: Squeegee Showers Every Time
Soap scum and mineral deposits build slowly but surely. A quick squeegee after each shower removes the water that carries soap and minerals. Follow with a microfiber touch-up on corners and shelves. This 60-second habit slashes deep-clean time by half over the course of a month.
Tip 8: Ventilate for Faster Drying
Run exhaust fans during and after showers, open windows when weather allows, and consider a small dehumidifier if your bathroom has no window. Faster drying reduces mildew regrowth and maintains a fresher smell, especially in compact Elizabeth bathrooms where humidity lingers.
Tip 9: Seal Strategically
Sealing grout after a thorough clean buys valuable time against spills and stains. Use a penetrating sealer suitable for your grout type, wipe away excess from tiles, and allow proper cure time. Re-test by sprinkling water—if it stops beading and darkens the grout quickly, it is time to reseal. For natural stone, choose a sealer designed for that specific stone and finish.
Tip 10: Address Spills Immediately
Quick action prevents stains from setting in porous grout. Blot—do not rub—then clean the area with a compatible solution. Rinse and dry. In kitchens, consider placing a towel on the floor when frying or making sauces to catch stray droplets that might otherwise travel to grout lines.
Tip 11: Mind the Edges and Corners
Edges along baseboards, cabinet toe-kicks, and shower thresholds collect grime that standard mops and scrubbers miss. Use an old toothbrush or edge brush periodically to keep these areas as clean as open spaces. When corners gleam, the whole room looks cleaner.
Tip 12: Seasonal Strategies for Elizabeth
Winter: Dissolve road salt with plain water first, then follow with neutral cleaning. Place a boot tray near entrances and wipe floors the same day slush arrives. Spring: Pollen and fine dust collect on grout; an extra vacuum session before wet cleaning helps. Summer: High humidity fuels mildew—squeegee showers and run fans longer. Autumn: Leaf debris and yard soil enter on shoes; reinforce entry mats and increase dry mopping frequency.
Middle Insight: When to Add Firepower
If your regular approach hits a wall—persistent grout shadows, sticky kitchen film, or cloudy shower tile—augment your toolkit. A handheld steam unit used carefully on ceramic and porcelain can loosen residue, while a slightly stiffer nylon brush targets stubborn joints. If results plateau after a couple of methodical passes, it might be time to schedule professional tile and grout cleaning to reset surfaces. After a reset, your tips-based routine becomes faster and more effective.
What Not to Do
- Do not mix chemicals, especially bleach and ammonia.
- Do not use metal brushes or steel wool pads that can scratch and rust.
- Do not soak grout endlessly; excess water can weaken joints or seep behind tiles.
- Do not use acidic products on natural stone or glossy, delicate glazes.
Room-by-Room Tip Sheet
- Entry/Foyer: Dry mop daily in winter, neutral clean twice weekly if slush is heavy, and detail thresholds.
- Kitchen: Degrease splash zones weekly, neutral clean floors, and dry thoroughly to avoid streaks.
- Bathroom: Treat soap scum with gentle, repeated applications; squeegee and ventilate after every use.
- Laundry/Mudroom: Neutralize detergent drips, dissolve salt, and wipe under appliance feet where grime hides.
Long-Term Care: Build a Simple Routine
Establish a loop you can stick to: dry dust often, neutral clean weekly, spot-treat monthly, deep clean seasonally, and reseal as needed. Keep tools accessible and replace worn brushes. If you have pets or kids, add a quick inspection after muddy play or rainy days to catch soils before they settle into grout.
Frequently Asked Questions
Q: How do I brighten grout without harsh chemicals? A: Try an oxygenated cleaner and a medium-stiff brush on ceramic or porcelain installations. Rinse thoroughly and dry to gauge true color.
Q: Is vinegar safe on all tile? A: No. Avoid acids on natural stone and some high-gloss glazes. Use pH-neutral formulas when uncertain.
Q: How often should I seal grout? A: Test quarterly with a few drops of water. Reseal when water absorbs quickly and darkens joints.
Q: Why does my shower tile look hazy? A: Soap film and mineral residue scatter light. Use a soap-scum remover safe for your tile, rinse well, and dry with microfiber.
Q: Can I use colored sealers to recolor grout? A: Yes, color-seal products can refresh appearance and add stain resistance, but surface prep must be meticulous for even results.
Bring These Tips to Life
Start with one zone—an entry or a shower—and apply these tips step by step. You will see faster drying, brighter tiles, and cleaner grout within a single session. Keep your tools organized and your routine short and repeatable. When you want to leap ahead, schedule professional tile and grout cleaning to restore a clean slate that your day-to-day habits will maintain beautifully.