Introduction: A Beginner-Friendly Path to Cleaner Tile and Grout in Elizabeth, New Jersey
Shiny tile and bright grout can transform a room, but New Jersey’s changing seasons, indoor humidity, and everyday foot traffic can quickly dull that sparkle. If you are new to tile care, this beginner-focused guide will show you how to clean safely, effectively, and consistently. You will learn how to prepare your space, choose the right products, master a step-by-step routine, and keep your floors and walls looking their best in Elizabeth homes and apartments. If you want a local shortcut or need help with the toughest stains, you can always explore tile and grout cleaning to supplement your routine.
As a first-timer, it helps to understand how tile and grout behave. Tile surfaces are relatively resilient, but they still benefit from thoughtful cleaning. Grout, however, is porous and prone to absorbing oils, dirt, and moisture, which can discolor the surface and create areas where microbes cling. This guide explains how to address both materials without harsh techniques that risk damage.
You do not need complicated tools to start, but a clear plan and the right motions make a big difference. By following the steps below, you can avoid common mistakes like over-wetting, scrubbing with the wrong pad, or mixing incompatible chemicals.
Know Your Tile and Grout
Most homes in Elizabeth feature ceramic or porcelain tile in kitchens, bathrooms, and entryways. These materials are sturdy, but their finish and texture vary. Glossy tile resists staining but shows streaks, while matte tile hides streaks but can hold onto soils a bit more. Natural stone—such as marble, slate, or travertine—demands different care and should never be exposed to acidic cleaners. If you are not sure which tile you have, start with the mildest method and test in an out-of-the-way spot.
Grout is a cementitious material that sits slightly lower than the tile surface. Because it is porous, it readily absorbs liquids and fine dust. Sealed grout resists staining better, but sealers wear away over time, especially in high-traffic zones. Your cleaning approach should lift soils from the pores of the grout while minimizing saturation that could drive dirt deeper.
Finally, consider the room’s usage. Bathroom grout often faces soap scum and minerals from hard water. Kitchen grout may collect cooking oils and food residues. Entryway tile attracts road salts and abrasives. Tailoring your method to the room will save time and improve your results.
Safety and Preparation
Before you begin, open a window or use the bathroom fan to ensure good air movement. Wear household gloves to protect your skin from prolonged exposure to water and cleaning solutions. If you plan to use a stronger cleaner in a small space, ensure ventilation so you do not breathe concentrated vapors.
Clear the area of mats, small furniture, and items on the floor. Sweep or vacuum thoroughly to remove grit—this step prevents abrasive particles from scratching tile during wet cleaning. Place towels or a bucket nearby, along with your brushes and solutions, so you can work in a steady rhythm.
Always test your chosen cleaner on a small, hidden section of tile and grout. Watch for color changes, dulling, or residue. A safe test result gives you confidence to proceed across larger sections without worry.
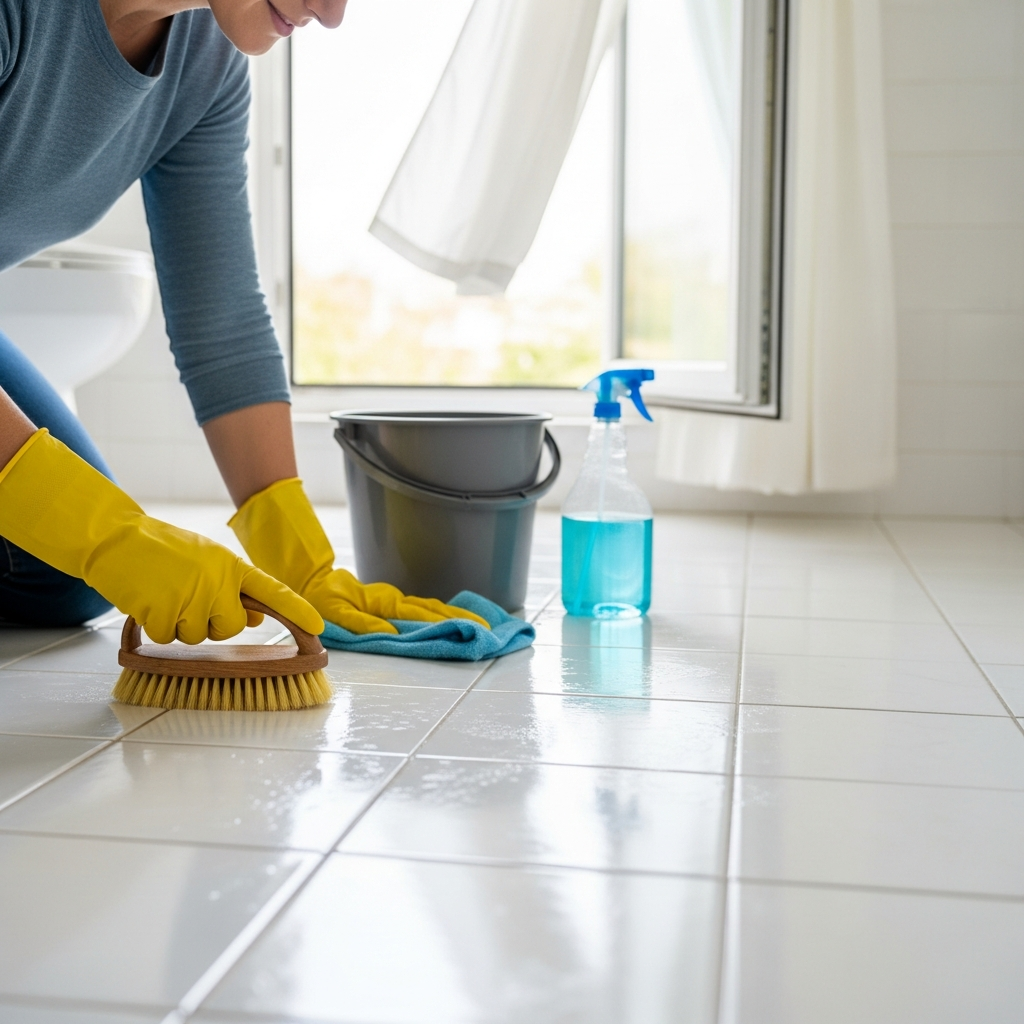
Tools and Supplies for Beginners
You can achieve a professional-looking outcome with simple tools: a bucket of warm water, a mild pH-neutral cleaner suitable for tile and grout, a soft microfiber mop or cloths, and a couple of brushes. A narrow grout brush with firm nylon bristles helps you work inside the grout lines without gouging the material. Avoid metal brushes in most cases, which can be too aggressive.
Microfiber cloths are essential because they lift and hold soils instead of smearing them around. A spray bottle is helpful for misting small areas rather than soaking the whole floor. Have dry towels ready for immediate wipe-up; this reduces the chance of water soaking into grout and ensures a clean finish.
For bathrooms with soap scum or mineral buildup, a non-acidic, tile-safe soap scum remover can help. Keep in mind that any specialty cleaner should be used according to label instructions and tested first. When in doubt, start with the gentlest option and increase strength only if needed.
Step-by-Step Cleaning Method
1. Dry Removal: Start with a thorough sweep or vacuum, paying attention to grout channels where dust can accumulate. Removing dry soils first prevents mud when liquid is applied.
2. Pre-Mist: Lightly mist a manageable section of the floor or wall (for instance, an area of three to four square feet). Avoid flooding. Pre-misting loosens surface dirt and reduces the amount of scrubbing required later.
3. Apply Cleaner: Use a pH-neutral tile cleaner diluted according to instructions. Apply with a microfiber mop or cloth. For walls and vertical surfaces, a spray bottle and cloth give you better control with less drip.
4. Agitate Tile Surface: Using a soft brush or non-scratch pad, gently agitate the tile to lift films, cooking residues, or soap scum. Work in small circles, applying only enough pressure to move soil without scratching.
5. Scrub Grout Lines: With your grout brush, work along each grout line using short, controlled strokes. Aim for consistency, overlapping strokes so you do not miss areas. If you encounter stubborn sections, allow the cleaner to dwell for a minute before scrubbing again.
6. Wipe and Rinse: Immediately wipe the area with a damp microfiber cloth to remove loosened soils and remaining cleaner. Follow with a dry towel to pick up leftover moisture. This two-step extraction is key to preventing residues and streaks.
7. Progress Methodically: Continue section by section. If you notice your water turning cloudy, change it. Working with clean water and cloths keeps soils from re-depositing.
8. Final Buff: After the entire surface is clean and mostly dry, buff with a fresh, dry microfiber cloth. This step enhances shine on glazed tile and leaves matte finishes evenly clean.
Dealing with Stains, Soap Scum, and Hard Water in Elizabeth
Local water conditions and seasonal humidity can make soap scum and hard water deposits more noticeable, especially in showers. If a pH-neutral cleaner is not enough, try a tile-safe, non-acidic product formulated for soap scum. Apply sparingly, let it dwell, then agitate gently and rinse thoroughly. Avoid acidic agents on natural stone and be cautious on unknown tiles. Patience and repeated gentle applications are better than one harsh session that risks damage.
Grease-based stains in kitchens respond to warm water and a mild degreasing cleaner safe for tile. Apply, dwell briefly, agitate lightly, and rinse. For colored food stains on grout, repeated light passes usually work better than heavy scrubbing. Allowing the grout to dry between attempts can also help you gauge progress without oversaturating.
Common Mistakes to Avoid
Over-wetting grout is one of the most common beginner errors. While grout looks tough, it absorbs liquids, and excessive moisture can invite stains to migrate deeper. Use controlled amounts of cleaner, focus on small areas, and extract promptly with clean, dry towels.
Another frequent mistake is using the wrong pad. Abrasive scrubbers that feel sandy can scratch glazed tile and dull its luster. If you are unsure, test a pad on a spare tile or an inconspicuous space. Also, avoid mixing chemicals, especially chlorine bleach and ammonia or acid-based products, which can create dangerous fumes and damage surfaces.
Finally, neglecting the rinse and dry step leads to hazy films and uneven appearance. Always remove spent cleaner and dissolved soils, then dry to reduce streaking and water spots.
Midway Checkpoint and When to Bring in Help
If you have followed the steps and still see deep discoloration or lingering haze, pause and assess. Heavily stained grout may require more dwell time, a slightly stronger cleaner appropriate for your material, or repeated light passes. In some cases—such as older grout with long-term discoloration—specialized machines and professional-grade techniques can help. Around this stage, many Elizabeth homeowners consider scheduling professional tile and grout cleaning to reset their surfaces before returning to a simple maintenance routine.
Whether you continue DIY or call for assistance, do not skip the drying process. Good air movement helps moisture evaporate, minimizing the chance of residues and ensuring a crisp finish.
Drying, Ventilation, and Finishing Touches
Open windows, run fans, and keep foot traffic off floors until they are dry to the touch. In showers, squeegee walls and glass after your next use to reduce mineral spotting. Buff kitchen tile lightly with a dry microfiber to remove any last traces of cleaner and achieve a uniform look.
Pay attention to grout lines a few hours after cleaning. If they appear darker in some areas, residual moisture may still be present. Increase airflow and wait before judging the final color. Rushing into additional scrubbing while grout is damp can cause erosion or wear.
Sealing and Ongoing Maintenance
Once your grout is clean and fully dry, consider applying a penetrating sealer recommended for your grout type. Sealer helps resist stains and makes future cleaning easier. Follow product instructions carefully and allow proper curing time before wetting the area.
For maintenance, adopt a simple schedule. In high-traffic entryways, dry dust or vacuum daily and perform a quick damp clean once or twice a week. Kitchens benefit from frequent wipe-ups, especially after cooking. Bathrooms stay brighter when you squeegee after showers and perform a weekly cleaner-and-scrub routine.
Avoid heavy build-up by addressing spills promptly. A quick blot and gentle wipe can prevent deep staining that is harder to remove later.
Elizabeth, New Jersey Considerations
Seasonal weather in Elizabeth can bring road salt, slush, and grit into entryways. Place mats at exterior doors and encourage everyone to remove or wipe shoes. This simple habit dramatically reduces abrasive wear and staining on grout.
Humidity swings can also influence drying times. In summer, consider using a dehumidifier in basements or lower-level bathrooms. Consistent airflow and moderate humidity help your cleaning results last longer and discourage mildew growth.
Frequently Asked Questions
Q: How often should beginners clean tile and grout?
A: A light weekly cleaning with a pH-neutral product keeps soils from settling into grout. Heavier cleanings can be monthly or as needed, depending on traffic and room use.
Q: Can I use vinegar on my grout?
A: Vinegar is acidic and can etch certain tiles and degrade grout over time, especially cement-based grout. It is safer to use pH-neutral cleaners specifically designed for tile and grout.
Q: What brush should I use for grout lines?
A: A firm nylon grout brush is ideal. It reaches into pores without scratching tile or gouging grout. Avoid metal brushes and highly abrasive pads.
Q: How do I know if my grout needs sealing?
A: Sprinkle a few drops of water on a clean, dry grout line. If the water darkens the grout quickly, it is absorbing moisture and could benefit from a penetrating sealer.
Q: Why does my tile look hazy after cleaning?
A: Haze usually indicates leftover cleaner or dissolved soils that were not fully removed. Rinse with clean water and buff dry with microfiber to restore clarity.
Q: What should I do about moldy grout in a bathroom?
A: Improve ventilation first. Clean with a tile-safe cleaner, scrub gently, and dry thoroughly. Persistent growth may indicate chronic moisture or inadequate airflow; address the source to prevent recurrence.
Q: Are steam cleaners safe for beginners?
A: Steam can help on some ceramic or porcelain installations, but it may force moisture into grout or damage sealers. Use cautiously and test first. Avoid on natural stone unless a pro confirms it is safe.
Q: How can I protect entryway grout during winter?
A: Use door mats, adopt a shoe-wiping habit, and perform frequent dry sweeping to remove grit and salt. Quick damp cleaning prevents stains from setting.
Ready for Consistently Clean Tile?
You now have a clear, beginner-friendly plan tailored to Elizabeth homes. Start small, work methodically, and focus on careful rinsing and drying. If you run into stubborn grime, do not be discouraged—repeat gentle passes and give grout time to dry between attempts.
When you want a deeper reset or prefer to save time, schedule trusted tile and grout cleaning services to bring back a like-new look and make routine upkeep simpler. A clean, bright floor or shower not only looks great, it also makes daily living feel fresher and more comfortable.