Bathrooms in New Jersey deal with a unique mix of humidity, temperature swings, hard water, and daily traffic. These conditions invite soap scum, mineral deposits, mildew, and embedded grime into grout lines, making routine care essential. This step-by-step guide equips you to restore clarity safely and keep it that way. While DIY can be effective for maintenance, there are times when professional help is the smarter path, especially for deep-set staining or stone surfaces. Early on, it is helpful to understand what a full professional process looks like, so we will reference comprehensive tile and grout cleaning as the benchmark for results you can aim toward.
Know your surfaces
Identify tile material before choosing products. Ceramic and porcelain are resilient and accept a broad range of neutral or mildly alkaline cleaners. Natural stones like marble, limestone, and travertine require stone-safe, pH-balanced products to avoid etching. Glass and metal mosaics need gentle agitation to prevent scratching. Grout can be cementitious or epoxy; cementitious grout is porous and benefits from sealing after cleaning.
Take a moment to assess condition. Are grout lines dark or spotty? Do tiles have a film or visible water spots? Is there mildew at corners or along silicone seams? Does the shower floor feel slick even after mopping? Your answers inform the approach and set realistic expectations.
Tools and supplies checklist
- Vacuum with hard-floor setting or soft broom
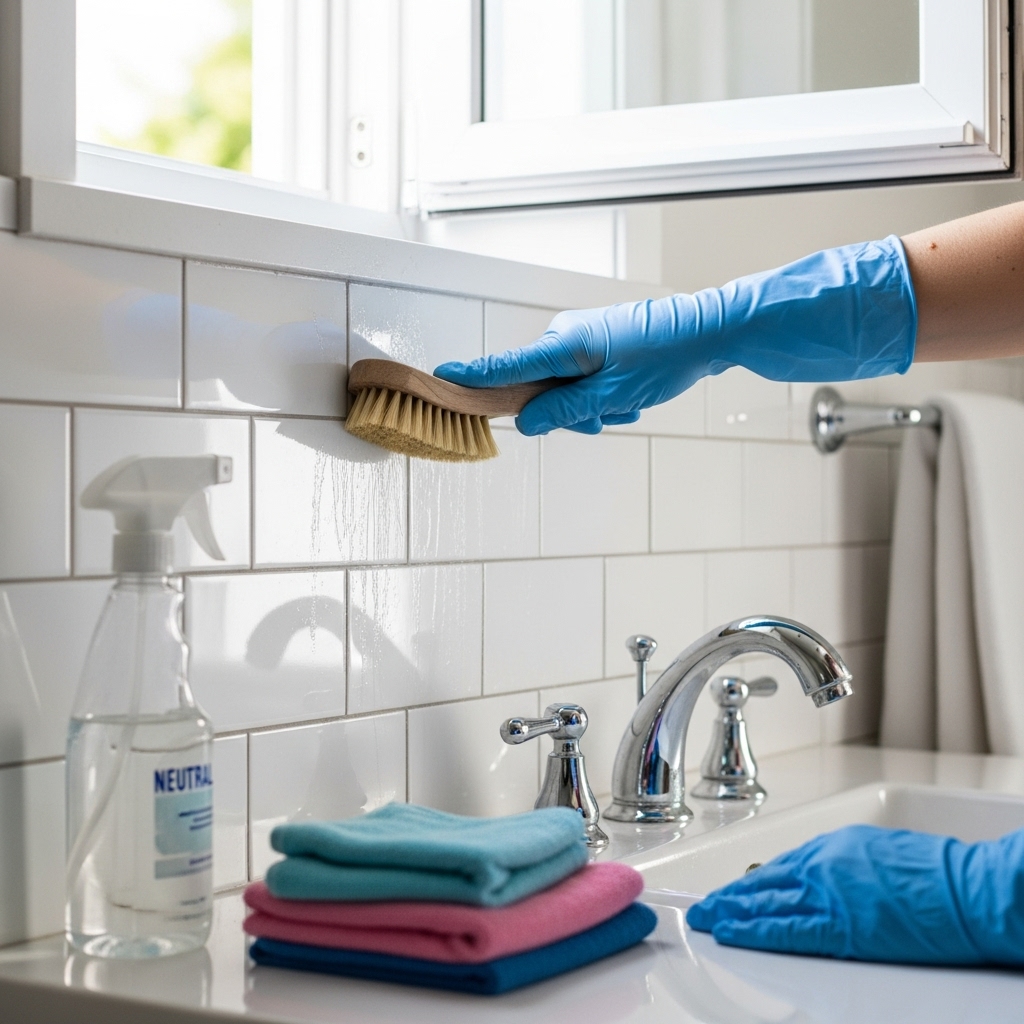
- Microfiber cloths and mop
- Neutral or stone-safe cleaner
- Soft to medium grout brushes in multiple sizes
- Non-scratch pads for tile faces
- Spray bottles for controlled application
- Buckets for clean and rinse water
- Squeegee for walls and glass
- Fans for ventilation and faster drying
- Personal protection: gloves and eye protection
Preparation and safety
Ventilate the bathroom by turning on the fan and opening a window if possible. Remove mats, trash bins, and small furniture. Protect adjacent materials such as painted trim and wood thresholds with towels. Confirm that any natural stone is treated with a product labeled stone-safe. Test cleaners in an inconspicuous area before widespread use.
Step-by-step cleaning process
- Dry soil removal: Vacuum or sweep floors and dust baseboards. Dry removal prevents making mud when solution is applied.
- Pre-wet grout lines lightly: A light pre-wet improves chemical distribution and prevents oversaturation.
- Apply cleaner: Use a neutral or stone-safe cleaner for most surfaces. For soap scum or body oils, a product rated for bathroom residues is appropriate. Spray walls from bottom to top to avoid streaking.
- Dwell time: Allow the solution to sit according to label directions. Dwell is the unsung hero that loosens soils before you scrub.
- Agitate: Use grout brushes along joints with short, controlled strokes. For tile faces, use non-scratch pads. Work small sections to keep solution active.
- Rinse and extract: Wipe or mop with clean water. On floors, multiple passes with fresh water prevent residue. On walls, use a squeegee to drive water off the surface, followed by a towel.
- Spot treat: Reapply cleaner to stubborn areas. For mineral spots, choose a compatible remover for your tile type. Avoid harsh acids on natural stone.
- Drying: Run the fan, open the window, and use towels to remove remaining moisture, especially in corners and along grout lines.
Shower-specific guidance
Focus on corners, ledges, and niches where water lingers. Pay attention to the shower floor, which traps oils and soap residues. Use a narrow grout brush along joints and around drains. After cleaning, a daily or every-other-use squeegee routine dramatically slows buildup, especially on glass and smooth tile.
Mildew and odor control
Consistent airflow is the most important tool against mildew. Run the exhaust fan during and after showers. Keep shower doors or curtains open to promote drying. If you notice persistent odor along grout lines, it may indicate deeper absorption requiring a stronger reset.
Sealing after cleaning
Once the bathroom is thoroughly cleaned and dry, consider sealing grout and, if appropriate, stone tiles. Sealer reduces absorption so soils stay on the surface and wipe up more easily. Follow label directions for cure time before getting the area wet again. Even coverage is vital; apply in small sections and wipe excess from tile faces to avoid haze.
Common mistakes to avoid
- Over-wetting floors, which can drive soils deeper or seep into subfloors.
- Using harsh or acidic cleaners on natural stone, which can etch and dull the surface.
- Skipping dwell time, forcing you to over-scrub and still getting mediocre results.
- Leaving residue by not rinsing with clean water; sticky films attract dirt quickly.
- Neglecting ventilation, which encourages mildew to return.
Maintenance rhythm for New Jersey homes
Set a cadence that matches your household. For busy bathrooms, a weekly light scrub of grout lines and a daily squeegee habit on walls and glass pays dividends. In winter, track salt and grit carefully to avoid abrasive residue in adjoining rooms. In shore towns, combat sand with mats and frequent sweeping to protect grout from abrasion.
When to call in a professional
If grout remains dark despite diligent scrubbing, if you see etched stone, or if mildew returns rapidly, it is time for a professional reset. Pros use controlled heat, stronger agitation, and high-efficiency extraction to pull soils from pores. They also choose chemistry suited to your tile and grout type, which is particularly important for natural stone and epoxy grout.
Blending DIY with expert help
A practical approach is to have professionals restore the bathroom to a near-new baseline, then maintain with DIY habits. This reduces the effort required to keep the space bright and sanitary. If you are comparing options, review what comprehensive tile and grout cleaning includes so you can align your maintenance plan with proven methods.
Frequently asked questions
Q: How often should I deep clean a New Jersey bathroom? A: For busy households, a monthly deep clean keeps grout from darkening. Guest bathrooms may need less frequent attention.
Q: Can I use vinegar on grout? A: Avoid acidic products on natural stone and use them cautiously on cementitious grout. Neutral or stone-safe cleaners are generally safer and effective when used correctly.
Q: How do I know if grout needs sealing? A: Drip a small amount of water on clean, dry grout. If it darkens quickly, it is absorbing and would benefit from sealer.
Q: Will sealing prevent all stains? A: Sealing improves resistance but does not make grout stain-proof. Prompt cleanup and proper cleaners are still necessary.
Q: What about colored grout? A: Use compatible products and test first; some pigmented grouts are more sensitive to harsh cleaners.
Q: Is steam cleaning safe in bathrooms? A: On many ceramic and porcelain tiles, controlled steam can help cut soap scum. On natural stone or damaged grout, avoid or use with great caution.
Checklists you can follow
- Daily or every-other-use: squeegee walls, wipe fixtures, run the fan.
- Weekly: vacuum floors, clean grout lines, wipe glass and metal accents.
- Monthly: deep clean with dwell time and thorough rinsing; inspect for caulk or grout repairs.
- Seasonal: address hard water spots, refresh sealing as needed, and verify ventilation performance.
Final touches for a spa-like finish
After cleaning, buff tile faces with a dry microfiber to remove water marks. Align rugs and mats to avoid trapping moisture. Keep a caddy with brushes and cleaner accessible so touch-ups are fast and painless. Small routines compound into long-lasting clarity.
Ready to refresh your bathroom?
If your tile and grout need more than a routine scrub, consider scheduling professional tile and grout cleaning so you can enjoy a brighter, healthier bathroom with less effort week after week.