Introduction: Understanding the Tile and Grout Cleaning Process in Elizabeth, NJ
Whether your kitchen tile looks tired or your shower grout has lost its crisp lines, a clear, repeatable process can restore the surfaces that make your home shine. In Elizabeth, New Jersey, where seasonal weather and indoor humidity create unique cleaning challenges, following a structured approach ensures consistent, safe results. This guide explains the entire workflow from dry soil removal to finishing touches so you can clean with confidence—and know when a professional reset may be helpful. To explore expert support while you read, consider local tile and grout cleaning as a convenient option.
Understanding the “why” behind each step is just as important as learning the “how.” When you know what soils you are targeting and how different surfaces react to moisture and agitation, you avoid wasted effort and reduce the risk of dulling or damage.
Grout—the thin lines between tiles—is porous and susceptible to staining. Tile, especially porcelain and ceramic, is more durable but still benefits from careful handling. The process below helps you clean both components efficiently.
Step 1: Identify Materials and Conditions
Start by identifying the tile material. Ceramic and porcelain are common in Elizabeth homes and tolerate pH-neutral cleaners well. Natural stone, including marble and travertine, needs special care; acidic or harsh products can etch the surface. If you are unsure, err on the side of gentleness and test in an inconspicuous spot.
Next, consider your local environment. Entryways may accumulate grit and road salts during winter. Bathrooms see soap scum and hard water deposits. Kitchens face oils and food residues. These differences inform your choice of cleaner and the amount of agitation required.
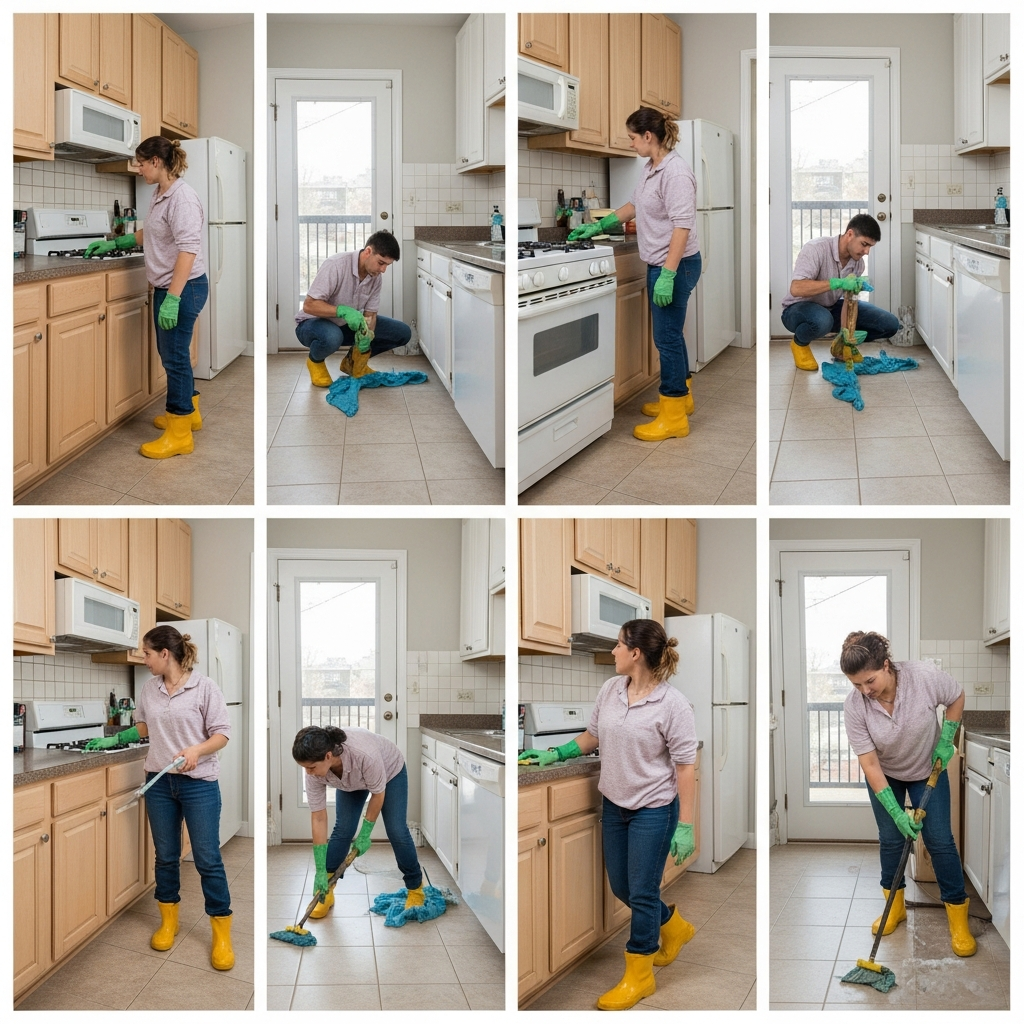
Step 2: Dry Soil Removal
Every effective cleaning process begins with dry removal. Sweep or vacuum thoroughly to capture grit and dust from both tile and grout channels. Removing dry particles first prevents them from turning into muddy film once wet solutions are applied, and it protects tile from micro-scratches.
Use a vacuum with a hard floor setting if available, and pass slowly over grout lines where fine debris often collects. This small investment of time pays dividends when you move to wet steps.
Step 3: Controlled Pre-Mist
Pre-mist a small working area, usually three to four square feet. The mist softens light soils and primes the surface for cleaner application without over-wetting. Over-saturation is the enemy of grout; it can drive soils deeper and prolong drying, so keep moisture measured and intentional.
Allow a brief dwell—about a minute—to loosen films and dust. While waiting, organize your brushes and cloths so each tool is within reach.
Step 4: Apply a pH-Neutral Cleaner
Use a pH-neutral cleaner designed for tile and grout, diluted according to instructions. Apply via a microfiber mop for floors or a spray bottle and cloth for walls and counters. Neutral solutions are effective on everyday soils and safe for most ceramic and porcelain installations.
If you are dealing with bathrooms affected by soap scum, you may select a specialty soap scum remover that is safe for your tile type. Always test first and avoid acidic products on natural stone.
Step 5: Agitation on Tile
With a non-scratch pad or soft brush, agitate the tile surface using light, circular motions. Your goal is to lift soils and residues without marring the finish. Glossy tile shows scratches more readily, while matte tile can hang onto fine films; light pressure and clean pads prevent both problems.
Refresh your pad or cloth as soon as it looks soiled. Re-depositing grime is a common reason for streaks and haze.
Step 6: Targeted Grout Scrubbing
Switch to a firm nylon grout brush and work along each grout line. Use short, overlapping strokes to reach into pores. If you hit a stubborn patch, allow the cleaner to dwell longer, then scrub again. Gentle repetition is safer and more effective than aggressive force.
Because grout absorbs moisture, extract promptly after scrubbing. Lingering liquids can draw soils back into pores as they evaporate.
Step 7: Rinse and Extract
Rinse with clean water using a damp microfiber cloth or mop, then immediately follow with a dry towel. This two-step extraction removes residues and prevents haze. Change your rinse water often; cloudy water signals that you are redepositing dirt.
For vertical surfaces like showers, wipe from top to bottom to catch drips. Follow with a dry cloth to minimize water spots and get a crisp finish.
Step 8: Drying and Ventilation
Encourage airflow with open windows or a fan. Keep foot traffic off floors until they are dry to the touch. Bathrooms benefit from a squeegee after each use; removing water quickly discourages mineral deposits and soap scum buildup between deep cleans.
Check grout an hour later. If some sections look darker, they may still be damp. Allow more time before evaluating color uniformity.
Process Refinements for Elizabeth Homes
In winter, entrance tiles face road salts and gritty particulates. Place door mats and perform frequent dry sweeps to capture abrasive debris before wet cleaning. In spring and summer, humidity may extend drying times. Use fans and a dehumidifier in lower-level spaces to keep conditions consistent.
Kitchens benefit from quick wipe-ups after cooking. A little preemptive care limits the oil film that can slowly darken grout lines over months.
Stains and Special Situations
For soap scum and hard water on shower tile, a tile-safe, non-acidic specialty cleaner can help. Apply, allow short dwell time, agitate gently, and rinse thoroughly. For greasy kitchen soils, use a mild degreaser that is safe for tile. Colored stains embedded in grout often respond to repeated gentle cycles rather than a single harsh pass.
If prior occupants used the wrong chemicals or abrasive pads, you may be dealing with etched spots or dulled glaze. In those cases, adopt a conservative approach and consider a professional assessment for restoration options.
Sealing and Long-Term Care
Once the surface is clean and fully dry, sealing grout with a penetrating sealer helps resist future stains and makes routine cleaning easier. Follow label directions and allow the recommended cure time before exposing the area to water or heavy use.
For maintenance, schedule light weekly cleanings and monthly deeper sessions as needed. Maintain good ventilation in bathrooms and adopt “no shoes” or “wipe shoes” habits at entrances. These small choices dramatically extend the life of your clean.
When to Consider Professional Help
Even with a sound process, some grout lines remain deeply stained, especially in older homes or high-traffic zones. Equipment designed to flush pores and lift embedded soils can produce a noticeable reset. If you want to save time or need a stronger result, arrange professional tile and grout cleaning and then return to an easy maintenance routine.
Professionals can also evaluate whether re-coloring or re-grouting is the best path to an even appearance. These solutions go beyond cleaning and may be worth considering for a long-term refresh.
Frequently Asked Questions
Q: Why is dry soil removal the first step?
A: Removing grit and dust before wet cleaning prevents abrasion and reduces muddy residue, leading to a cleaner finish and fewer streaks.
Q: What cleaner is safest for most tiles?
A: A pH-neutral tile and grout cleaner is generally safe for ceramic and porcelain. Always test first and avoid acidic products on natural stone.
Q: How much moisture should I use on grout?
A: Use as little as necessary. Mist, scrub, and extract promptly. Excess water can drive soils deeper and prolong drying time.
Q: How do I deal with soap scum?
A: Use a tile-safe, non-acidic soap scum remover, allow brief dwell time, agitate gently, and rinse thoroughly. Keep the area well-ventilated.
Q: Is sealing necessary?
A: Sealing clean, dry grout with a penetrating sealer improves stain resistance and simplifies maintenance. Reapply as recommended by the product.
Q: Can I use the same process on shower walls and floors?
A: Yes, but control moisture more carefully on walls and use a squeegee after showers. For floors, keep traffic off until fully dry.
Bring Your Tile Back to Life
With a clear process, your tile and grout can look consistently fresh. Work in small sections, extract thoroughly, and tailor steps to each room’s challenges. If you prefer a faster path to a true reset or want expert guidance, book trusted tile and grout cleaning services and enjoy a like-new shine with less effort. A well-defined process today means simpler maintenance tomorrow.