Why Inspection Comes First
Successful upholstery cleaning begins with a thorough inspection that guides every chemical and technique decision. In Elizabeth, New Jersey—where homes range from historic rowhouses to modern apartments—furniture construction and textile variety demand a precise pre-clean plan. This article defines a clear inspection framework you can follow before a single drop of cleaner touches your fabric. For reference and shared terminology, you can compare your inspection notes to industry-aligned guidance on upholstery cleaning so that your decisions are consistent and safe.
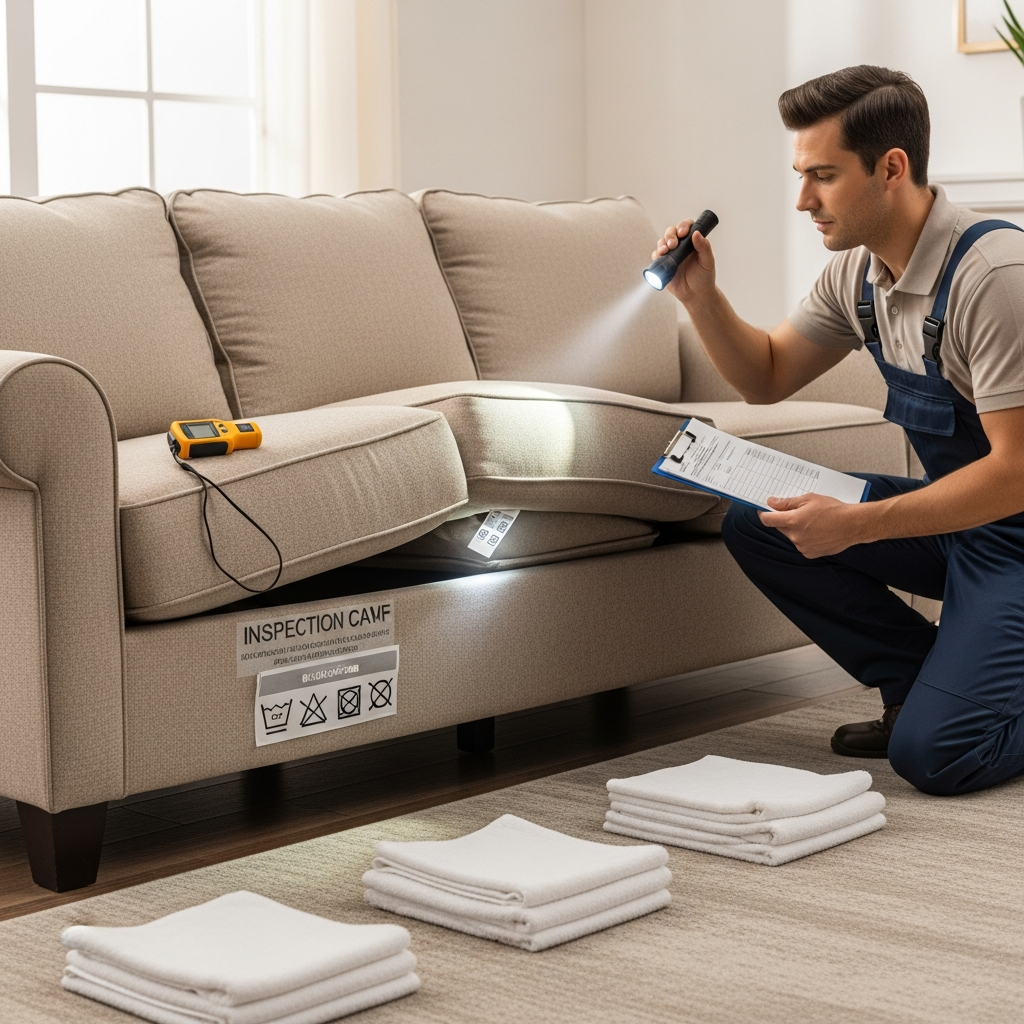
Step 1: Identify the Fabric and Cleaning Code
Locate the manufacturer’s tag and note the code: W (water-based), S (solvent-only), W/S (either with care), X (vacuum only). Record fiber content if listed—cotton, linen, wool, silk, rayon/viscose, acetate, polyester, nylon, acrylic, olefin, or blends. Pair this with an initial hand-feel assessment: tight-weave, open-weave, pile (velvet, chenille), or microfiber.
Step 2: Construction and Condition Survey
- Seat design: loose cushions, tight seat, channel tufting, or attached back.
- Trim and details: buttons, welt cords, decorative tape, nail heads.
- Structural integrity: frame stability, spring tension, webbing condition.
- Sewing and seams: loose threads, popped stitches, weakened zippers.
- Cushion cores: foam density, feather/down blend, batting wrap, presence of liners.
Photograph or document noticeable issues so you can re-check after cleaning. Fragile elements may require towel barriers, lower vacuum strength, or drier chemistry.
Step 3: Soil Load and Usage Mapping
Chart the distribution of body oils, dry soil, pet hair, spills, and odors. Elizabeth’s climate contributes to seasonal variables: humidity can push airborne particles deeper into fibers, and winter road grit collects on cushion fronts. Map how family members use the piece—preferred seats, armrest lean, headrest contact—to anticipate cleaning intensity and drying needs.
Step 4: Colorfastness and Moisture Sensitivity Tests
Perform a multi-point test: armrest underside, cushion back edge, and skirt hem. Apply chosen cleaner to a white towel, press, and observe dye transfer or distortion. For moisture sensitivity, apply a tiny mist of water and blot. If rings or texture change appear, plan solvent-safe or ultra-low-moisture methods.
Step 5: Existing Damage and Risk Factors
- Fading or sun-bleaching near windows
- Previous chemical residues from DIY attempts
- Rust marks from metal fasteners
- Pet contamination penetrating foam cores
- Cellulosic browning risk on cotton or rayon
Note all risks and discuss realistic outcomes with anyone involved in the project. Documentation protects the fabric and your time by setting appropriate expectations.
Step 6: Access and Containment Planning
Plan safe access around the piece, protect nearby flooring with towels, and clear end tables and lamps. Prepare ventilation—fans and, in humid months, dehumidification—to control dry times. In apartments, check building policies regarding ventilation or chemical use in shared spaces.
Step 7: Tool and Chemistry Selection
- Cleaners: neutral to mildly alkaline for synthetics; acidic-leaning for natural fibers.
- Spotters: enzyme for proteins, tannin spotter for beverages, solvent for oils, specialty for ink/dye.
- Rinse: slightly acidic to stabilize color and feel.
- Applicators: soft brush, microfiber towel, terry bonnet pads for controlled agitation.
- Extraction: upholstery tool with adjustable flow; towel extraction for S-coded fabrics.
Step 8: Pilot Area and Process Confirmation
Choose a small, inconspicuous area and execute the full mini-process: vacuum, precondition, agitate lightly, spot treat, rinse/extract or blot, and dry with airflow. Inspect texture, color, and odor after five to ten minutes. If results are stable and improved, proceed section by section.
Step 9: Moisture Management Strategy
Set a maximum moisture goal per section to avoid rings and wick-back. Use light, even application and multiple short extraction passes rather than flooding the area. Groom pile promptly and establish fan placement ahead of time to maintain rhythm.
Step 10: Post-Inspection and Documentation
After cleaning a section, compare to pre-inspection photos: seam integrity, nap lay, color uniformity, and odor reduction. Note any areas needing a second pass or specialized spot work. Good records make follow-up maintenance predictable.
Elizabeth, NJ Specifics
Many homes feature mixed textiles—microfiber family sectionals in the den and linen chairs in dining areas. Older homes may have heirlooms with delicate trims; new builds may include synthetics with durable finishes. Plan for humidity in summer by scheduling airflow, and in winter, protect against abrasive grit tracked from sidewalks.
Inspection Checklist You Can Print
- Locate tag and record code/fiber content.
- Note construction details and fragile elements.
- Map soils, stains, odors, and pet impact.
- Test colorfastness at three points.
- Evaluate moisture sensitivity.
- Identify pre-existing damage.
- Plan access, protection, and airflow.
- Select tools, cleaners, spotters, and rinse.
- Run a pilot area.
- Document results and adjust plan.
Frequently Asked Questions
Q: What if the tag is missing or illegible?
A: Rely on testing—colorfastness and moisture sensitivity—and start with the gentlest options. Observe closely and escalate only if stable.
Q: How do I assess odor sources?
A: Smell cushions separately, compress foam slightly to identify deep contamination, and inspect under cushions and skirts where crumbs and pet hair collect.
Q: Can I inspect velvet and chenille the same way as flat weaves?
A: Yes, but pay special attention to nap direction, pile distortion risk, and grooming needs during drying.
Q: What is cellulosic browning and how do I anticipate it?
A: It is discoloration in natural fibers like cotton and rayon when overwet or left too alkaline. Testing and an acidic rinse plan help prevent it.
Q: Should I remove cushion covers for inspection?
A: Removing covers may stress seams or cause shrinkage if later washed. You can unzip slightly to inspect foam and batting, but avoid full removal unless the manufacturer approves.
Q: How much time should inspection take?
A: Ten to twenty minutes for a typical sofa is common, longer for delicate or heavily soiled pieces. Time invested here prevents rework.
Q: Do I need special tools to inspect?
A: A bright flashlight, white towels, a soft brush, and your nose are often enough. For advanced issues, moisture meters and UV lights help locate hidden contamination.
Q: How do I document effectively?
A: Take photos of key areas, label them by location, and jot notes about test results, chemistry choices, and airflow plans.
Q: Is solvent-only fabric impossible to clean at home?
A: Not impossible, but it requires patience, ventilation, towel application methods, and restraint with product amounts.
Q: What if I discover dye bleed during testing?
A: Stop water-based plans, switch to the driest method possible, and consider professional help for color stabilization.
Turn Inspection Into Predictable Results
A thoughtful inspection leads to safer chemistry, better drying, and cleaner-looking upholstery. Walk through the checklist, document carefully, and adapt your plan to the fabric and construction in front of you. If you want to validate your approach before cleaning begins, compare it with trusted best practices in upholstery cleaning and give your Elizabeth home the refreshed comfort it deserves.